今回は画面の下部にあるナビゲーションバーの実装方法サンプルです。
この記事で分かること
✅BottomNavigationBarの実装方法
✅BottomNavigationBarの主なプロパティについて
目次
サンプル画面
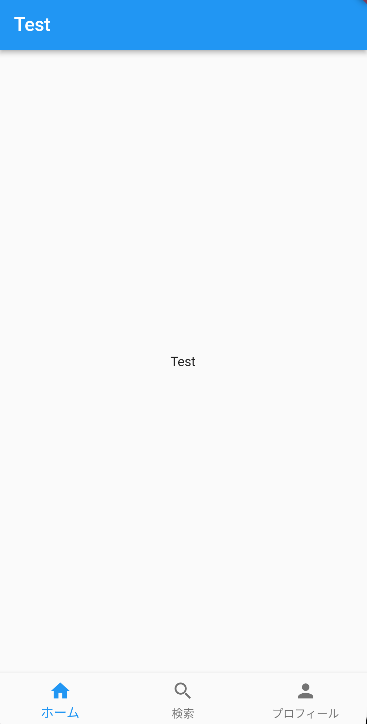
このように、スマホアプリの画面下によくあるバーを実装します。
サンプルコード
import 'package:flutter/material.dart';

void main() {
  runApp(const MyApp());
}

class MyApp extends StatelessWidget {
  const MyApp({super.key});

  @override
  Widget build(BuildContext context) {
    return MaterialApp(
      title: 'Test',
      theme: ThemeData(
        primarySwatch: Colors.blue,
      ),
      home: const Test_BottomNavigationBar(),
    );
  }
}

class Test_BottomNavigationBar extends StatefulWidget {
  const Test_BottomNavigationBar({super.key});

  @override
  State<Test_BottomNavigationBar> createState() => _Test_BottomNavigationBar();
}

class _Test_BottomNavigationBar extends State<Test_BottomNavigationBar> {

  int _selectedIndex = 0;

  void _onItemTapped(int index) {
    setState(() {
      _selectedIndex = index;
      print("タップされた場所は" + _selectedIndex.toString());
    });
  }

  @override
  Widget build(BuildContext context) {
    return Scaffold(
      appBar: AppBar(
        title: const Text("Test"),
      ),
      body: const Center(
        child: Text("Test"),
      ),
      bottomNavigationBar: BottomNavigationBar(
        items: const [
          BottomNavigationBarItem(
            icon: Icon(Icons.home),
            label: 'ホーム',
          ),
          BottomNavigationBarItem(
            icon: Icon(Icons.search),
            label: '検索',
          ),
          BottomNavigationBarItem(
            icon: Icon(Icons.person),
            label: 'プロフィール',
          ),
        ],
        currentIndex: _selectedIndex,
        onTap: _onItemTapped,
      ),
    );
  }
}
解説&実装手順
①ナビゲーションバーがタップされた場所を格納する変数を定義
int _selectedIndex = 0;
ナビゲーションバーは左のアイテムからインデックス数字が0、1、2となります。つまりインデックスが0だと、ナビゲーションバーの一番左の場所を指定してることになりますね。
②ナビゲーションバーがタップされたときの挙動を記述した関数を定義
void _onItemTapped(int index) {
  setState(() {
    _selectedIndex = index;
    print("タップされた場所は" + _selectedIndex.toString());
  });
}
ナビゲーションバーのアイテムタップ時にタップした場所のインデックスを引数として受け取り、①で定義した変数にそのインデックスを格納しています。加えてタップ時に本当にインデックスが変わっているのかを、print()関数でデバッグ確認できるようにしています。
③ナビゲーションバーのアイコンと文字をそれぞれ設定し②を呼び出す
bottomNavigationBar: BottomNavigationBar(
  items: const [
    BottomNavigationBarItem(
      icon: Icon(Icons.home),
      label: 'ホーム',
    ),
    BottomNavigationBarItem(
      icon: Icon(Icons.search),
      label: '検索',
    ),
    BottomNavigationBarItem(
      icon: Icon(Icons.person),
      label: 'プロフィール',
    ),
  ],
  currentIndex: _selectedIndex,
  onTap: _onItemTapped,
),
BottomNavigationBarItemを3つ設置しているので、サンプル画面のように3つのアイテムが表示されています。「currentIndex」プロパティはアクティブなアイテムのインデックスが入ります。「onTap」プロパティにはタップ時の挙動を記述します。ここでは、②で定義した「_onItemTapped」関数を呼び出しています。
BottomNavigationBarの主なプロパティについて
backgroundColor
背景色。
currentIndex
アクティブにするインデックスを指定できる。
elevation
ナビゲーションバーのZ軸方向の高さ。
fixedColor
アイテムがタップされたときの色。
iconSize
ナビゲーションバーすべてのアイコンのサイズ。
onTap
タップ時の挙動を定義できる。
selectedItemColor
選択されたアイテムの色。
おわりに
今回はBottomNavigationBarの実装方法サンプルの紹介でした。画面下のバーはスマホアプリでよく見かけると思います。この機会に実装できるようになりましょう!
最後までお読みいただきありがとうございました!
参考
BottomNavigationBar class - material library - Dart API